|
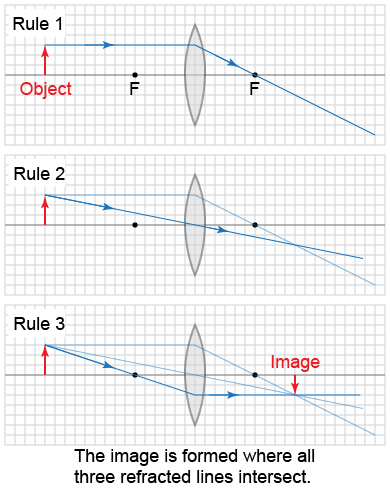
 A ray diagram can be used to find the location of the image for a converging lens using these rules:
 - Incident rays parallel to the optical axis refract through the far focal point.
- Incident rays passing through the center of the lens refract straight through the lens undeflected.
- Incident rays passing through the near focal point refract parallel to the optical axis.
The image is formed where all three refracted lines intersect. In the example at right, the image is inverted, real, and smaller than the object (magnification less than one). It is real because it is located on the far side of the lens from the object—and thus is composed of real light that could be projected onto a piece of paper. 
|
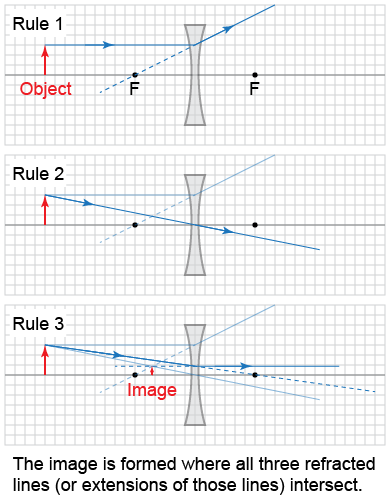
 In the same way, a ray diagram can be used to locate the image for a diverging lens. Rule #2 is the same as for a converging lens, but the other two rules are slightly different:
 - Incident rays parallel to the optical axis refract along a line passing through the near focal point.
- Incident rays passing through the center of the lens refract straight through the lens undeflected.
- Incident rays directed towards the far focal point refract parallel to the optical axis.
In the example at right, the image is upright, virtual, and smaller than the object. The image is virtual because it is on the same side as the object, and hence the image cannot be projected onto a piece of paper. 
|
Note that there are a number of cases where you have to extend the light rays in a ray diagram backward—such as in Rules 2 and 3 in the diverging lens example. These virtual light rays are usually drawn as dashed lines. If the image is formed at the intersection of these dashed lines, then it is a virtual image because no actual light is being focused at that location. 
|
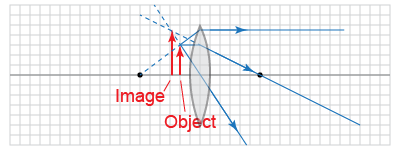
Draw a ray diagram for a converging lens where the image appears on the same side of the lens as the object. Be sure to mark the object, the image, and the focal point.
 |
 For a converging lens, if you place the object between the focal point and the lens, the image will be on the same side of the lens as the object. This is a virtual image!
|
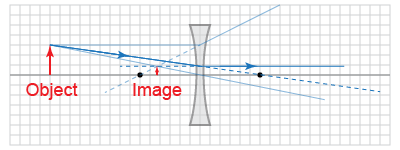
Draw a ray diagram for a diverging lens where the image appears on the same side of the lens as the object. Be sure to mark the object, the image, and the focal point.
 |
 The diverging lens example can be taken from the illustration above and is pictured at right. The object and image are both on the same side of the lens.
|

